Appendix B: In-situ photographs of derailed tank cars
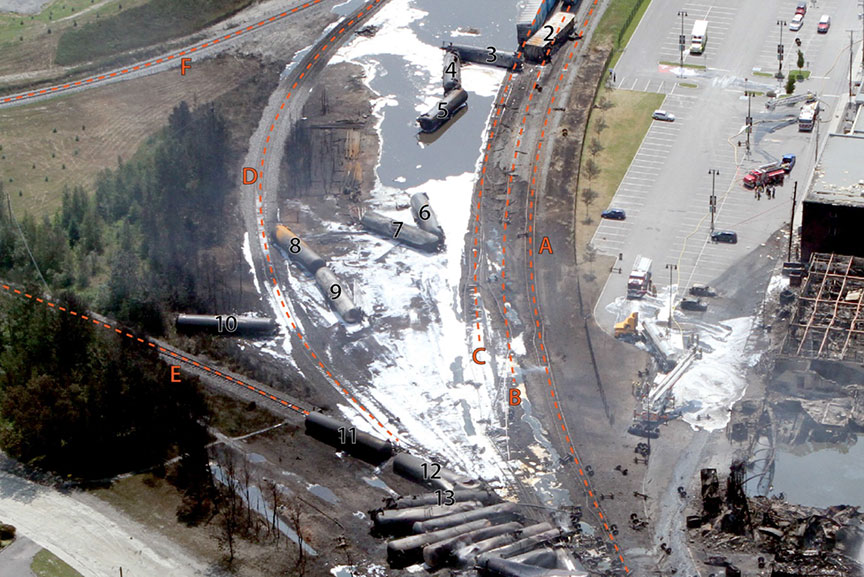
Figure B-1
Aerial view of derailment zone showing the position of derailed cars from consist no. 2 (box car) through consist no.13 (tank car NATX 310457)
Letters A through F indicate the different tracks:
A – main track
B – yard track 1
C – yard track 2
D – yard track 3
E – west leg of wye
F – east leg of wye
Figure B-2: Aerial views showing the orientation of the derailed tank cars
(a) The A end and B end are marked on each derailed tank car. Arrows point in the direction of the end leading in the occurrence train.
(b) Color coding indicates how each car came to rest with yellow (upright), pink (upside down) and violet (on its side).
Figure B-3: Aerial view looking north showing the orientation of consist no. 3 through 10
(a) Aerial view looking north showing consist no. 3 through 10. The broken portions of yard tracks 1 and 2 are circled.
(b) In-situ photo showing location of consist no.3 near a box car parked on yard track 2 (RSI-AAR Safety Project photo)
(c) In-situ photo showing a ground mark originating from the top fittings of consist no.5 (RSI-AAR Safety Project photo)
(d) In-situ photo showing a close-up of the area circled in Figure B-3a. The arrow points to a broken rail bent back 180 degrees (RSI-AAR Safety Project photo)
(e) In-situ photo showing a ground mark and debris originating from consist no.8 and 9 (RSI-AAR Safety Project photo)
Figure B-4: Aerial views of the derailment zone showing how the jackknifed cars came to rest against car TILX 316570 (consist no.12)
(a) View looking south
(b) View looking north
(c) View looking west. Note the rails impaled in the car's body bolster (circled)
Figure B-5: Aerial view of the derailment zone showing the main pile-up and last derailed cars
(a) View looking south. Cars were piled three deep in the circled zone.
(b) View looking south-west. The thermal tear in car NATX 310515 (consist no.63) is circled.
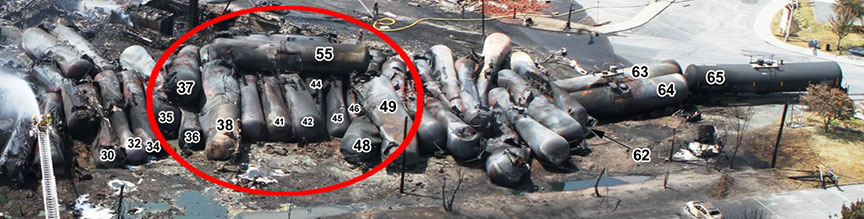
Figure B-6: In-situ photos of main pile-up
(a) View showing derailed tank cars partially embedded in soil and crushed against each other. The ends of consist no. 30, 32, 34, 36 and 38 are visible (field no. 26, 27, 28, 31 and 36, respectively) (RSI-AAR Safety Project photo)
(b) View looking north showing the piled up tank cars circled in Figure B-5a. From left to right, the ends of consist no. 45, 44, 42 and 41 are visible. Consist no.55 is resting on top of these cars.
(c) View looking south showing the piled up tank cars circled in Figure B-5a. From left to right, consist no. 42, 44, 45, 46, 48 (field no. 40, 42, 43, 44, 46) are visible. Consist no.47 (field no.45) is partially visible underneath consist no.48 (arrow). Consist no. 49 and 55 are resting on top of these cars (RSI-AAR Safety Project photo).
(d) Close-up showing consist no. 45, 46 and 47 (field no.43, 44 and 45) underneath the pile (RSI-AAR Safety Project photo)
Figure B-7
Photo taken after most of the cars were removed for recovery, showing the relative position of consist no.38, 39 and 55
Figure B-8
In-situ photo showing the head of consist no.64 (field no.56) impacted against consist no.62 (field no.55) (RSI-AAR Safety Project photo)
This lab report is part of the Transportation Safety Board of Canada's investigation report R13D0054.