In-flight breakup
Yellowhead Helicopters Ltd.
Bell Textron Inc. 212 (helicopter), C-GYHQ
Evansburg, Alberta, 4 NM WNW
The Transportation Safety Board of Canada (TSB) investigated this occurrence for the purpose of advancing transportation safety. It is not the function of the Board to assign fault or determine civil or criminal liability. This report is not created for use in the context of legal, disciplinary or other proceedings. See Ownership and use of content. Masculine pronouns and position titles may be used to signify all genders to comply with the Canadian Transportation Accident Investigation and Safety Board Act (S.C. 1989, c. 3).
Summary
On 28 June 2021, the Yellowhead Helicopters Ltd. Bell Textron Inc. model 212 helicopter (registration C-GYHQ, serial number 30933) was conducting operations in support of forest fire fighting efforts approximately 4 nautical miles west-northwest of Evansburg, Alberta. At approximately 1800 Mountain Daylight Time, the helicopter departed the staging area to complete a series of 3 flights transporting groups of forest fire fighters back to the staging area. The first 2 trips were completed uneventfully. During the last trip, as the helicopter was approaching the landing area to pick up the final group of fire fighters, one of the main rotor blades separated from the rotor head assembly. The second rotor blade and rotor head assembly then broke free from the helicopter and the helicopter crashed. The pilot, the sole occupant on board, was fatally injured. There was a post-impact fire that destroyed the helicopter. A signal from the 406 MHz emergency locator transmitter was not received.
1.0 Factual information
1.1 History of the flight
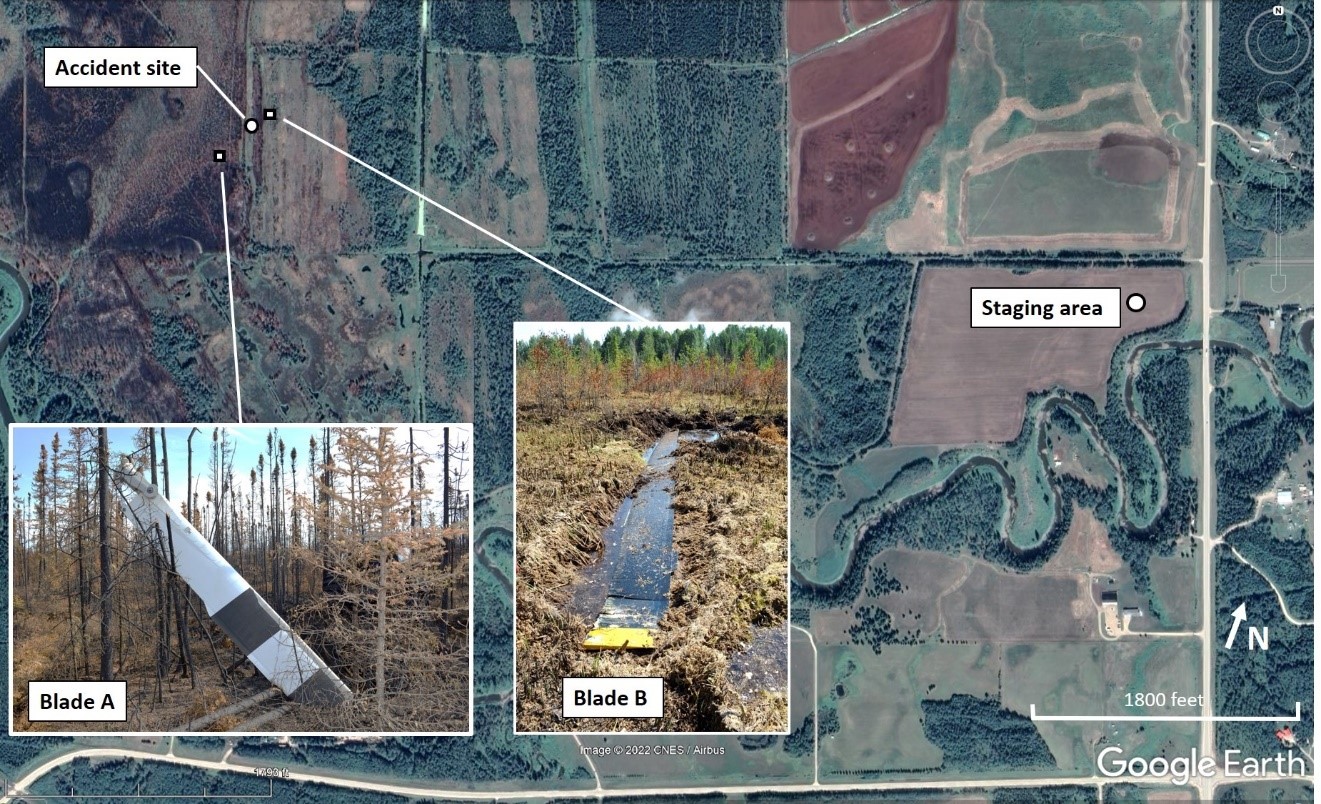
At approximately 1000Footnote 1 on 28 June 2021, the Yellowhead Helicopters Ltd. (Yellowhead Helicopters) Bell Textron Inc. (Bell) model 212 helicopter (registration C-GYHQ, serial number 30933) departed Edson Airport (CYET), Alberta, in support of fire fighting efforts on wildfire EWF-075, located 4 nautical miles (NM) west-northwest of Evansburg, Alberta. The helicopter arrived on scene at approximately 1025 to begin bucket support operations. These operations concluded at approximately 1246 and the pilot returned to the staging area to wait for his next assignment (Figure 1).
Shortly before 1800, the occurrence pilot received a request to transport 3 groups of fire fighters who were in the fire area back to the staging area. The helicopter departed at approximately 1800 and returned with the first group of fire fighters at 1811. The helicopter subsequently departed and returned to the staging area with the second group at 1819. The helicopter then departed to pick up the final group of 8 fire fighters.
During the final approach to the improvised landing pad in the muskeg, one of the main rotor blades separated from the rotor head assembly. Immediately after, the second main rotor blade and rotor head assembly broke free from the mast and helicopter, and the helicopter crashed. The pilot was fatally injured. A post-impact fire destroyed most of the helicopter.
A signal from the 406 MHz emergency locator transmitter (Kannad 406 AF ELT) was not received.
1.2 Injuries to persons
The pilot, who was the sole occupant on the helicopter, received fatal injuries during the accident. There were no injuries to anyone on the ground.
| Degree of injury | Crew | Passengers | Persons not on board the aircraft | Total by injury |
|---|---|---|---|---|
| Fatal | 1 | – | – | 1 |
| Serious | 0 | – | – | 0 |
| Minor | 0 | – | – | 0 |
| Total injured | 1 | – | – | 1 |
1.3 Damage to aircraft
The helicopter was destroyed by the significant impact forces and the post-impact fire.
1.4 Other damage
Not applicable.
1.5 Personnel information
The pilot held an airline transport pilot licence — helicopter and type ratings on the Bell 204, 206, 212, 47, and 47T; the Hughes 500 series of helicopters; the Kamov KA32; Robinson Helicopters models R22 and R44; and the Airbus AS350. The pilot held a valid Category 1 medical certificate. His last pilot proficiency check for the Bell 212 series of helicopters was conducted on 18 November 2020, and he completed his last Bell 212 written type exam on 08 July 2020.
The pilot held the appropriate licence and ratings for the flight in accordance with existing regulations.
| Pilot licence | Airline transport pilot licence — helicopter (ATPL-H) |
|---|---|
| Medical expiry date | 01 December 2021 |
| Total flying hours (as of 28 June 2021) | 12 395.3 |
| Flight hours on type (as of 28 June 2021) | 6612.4 |
| Flight hours in the 7 days before the occurrence | 21.4 |
| Flight hours in the 30 days before the occurrence | 29.1 |
| Flight hours in the 90 days before the occurrence | 70.1* |
| Flight hours on type in the 90 days before the occurrence | 32.8* |
| Hours on duty before the occurrence | 9.3 |
| Hours off duty before the work period | 11.5 |
* These numbers are approximate, based on the information available to the investigation.
1.6 Aircraft information
1.6.1 General
The Bell model 212 (Figure 2) is a utility helicopter powered by a Pratt & Whitney Canada PT6T-3B Twin-Pac engine. The rotor head is of the semi-rigid teetering design, with a 2-bladed main rotor that has a diameter of 48 feet. The aircraft incorporates traditional collective, cyclic, and anti-torque pedal controls.
| Manufacturer | Bell Textron Inc. |
|---|---|
| Type, model and registration | Helicopter, B212, C-GYHQ |
| Year of manufacture | 1979 |
| Serial number | 30933 |
| Certificate of airworthiness date | 14 January 2016 |
| Total airframe time | 29 627.3 hours |
| Engine type (number of engines) | Pratt & Whitney Canada PT6T-3B (1) |
| Rotor type (number of blades) | Semi-rigid (2) |
| Maximum allowable take-off weight | 11 200 lb |
| Recommended fuel types | Jet A, Jet A-1, Jet B |
| Fuel type used | Jet A |
1.6.2 Previous maintenance
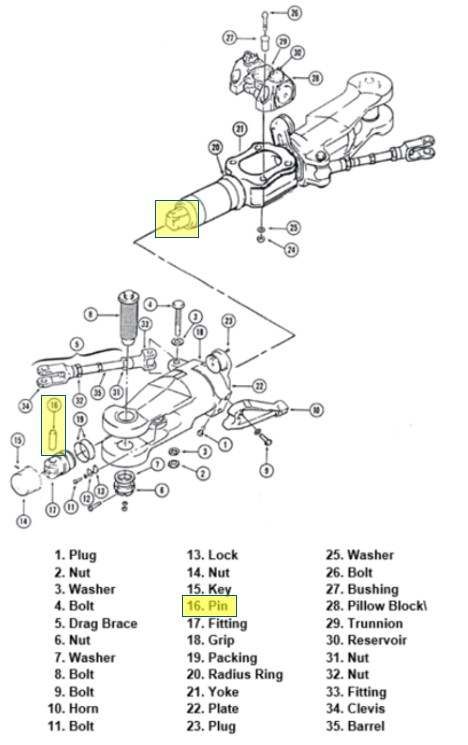
On 20 June 2021, the occurrence helicopter had scheduled maintenance performed at the Yellowhead Helicopters facility in Prince George, British Columbia (BC). Both main rotor hub straps and the associated main rotor hub strap retaining pins had been replaced with new parts acquired from Bell (see Appendix A for detailed breakdown of the parts). This work was completed to comply with the requirement to replace the parts after 1200 flight hours or 24 months. At the time, the helicopter had accumulated 29 605.9 hours total time on the airframe (TTAF). This maintenance action was completed by company maintenance personnel.
On 22 June 2021, a local post-maintenance test flight was conducted. No defects were noted. Between 22 and 27 June 2021, the occurrence helicopter accrued 18.9 flight hours.
The main rotor hub strap retaining pins had accrued approximately 21.4 hours time in service at the time of the occurrence.
1.7 Meteorological information
The nearest airport to the accident site is Whitecourt Airport (CYZU), Alberta, located approximately 45 statute miles (SM) to the northwest. The aerodrome routine meteorological report (METAR) for CYZU issued at 1800 and valid at the time of the occurrence reported the following:
- wind direction: 140° true (T) at 10 knots
- visibility: 15 SM
- sky conditions: clear
- temperature: 34 °C
- altimeter setting: 29.99 inches of mercury (inHg)
The METAR issued for CYET, located approximately 55 SM directly west of the accident site, at 1800 and valid at the time of the occurrence reported the following:
- wind direction: 070°T at 11 knots
- visibility: 9 SM
- sky conditions: clear
- temperature: 35 °C
- altimeter setting: 30.00 in Hg
Weather was not considered a factor in this occurrence.
1.8 Aids to navigation
Not applicable.
1.9 Communications
Not applicable.
1.10 Aerodrome information
Not applicable.
1.11 Flight recorders
The aircraft was not equipped with a flight data recorder or a cockpit voice recorder, nor was it required to be by regulation.
1.12 Wreckage and impact information
1.12.1 Wreckage site
The wreckage was located approximately 1 NM west-northwest of the staging area (Figure 3).
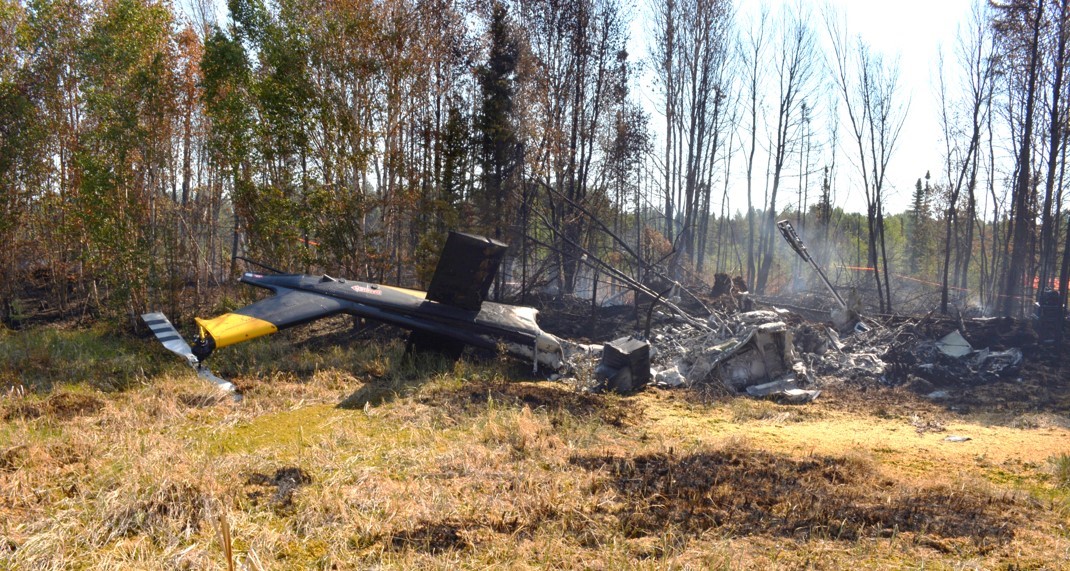
The helicopter came to rest on its right side in muskeg (Figure 4). The east side of the fuselage wreckage site was accessible via stable but burned out earth and trees. The west side of the fuselage wreckage was in a muskeg area in water that was several feet deep. The majority of the fuselage was consumed by the post-impact fire. The tail boom remained largely intact.
The first main rotor blade to separate from the helicopter (blade A, Figure 3) came to rest in a burned out bush area approximately 460 feet southwest of the main wreckage site. The tip of this blade was buried in the muskeg approximately 10 feet deep, with the blade grip end pointing up.
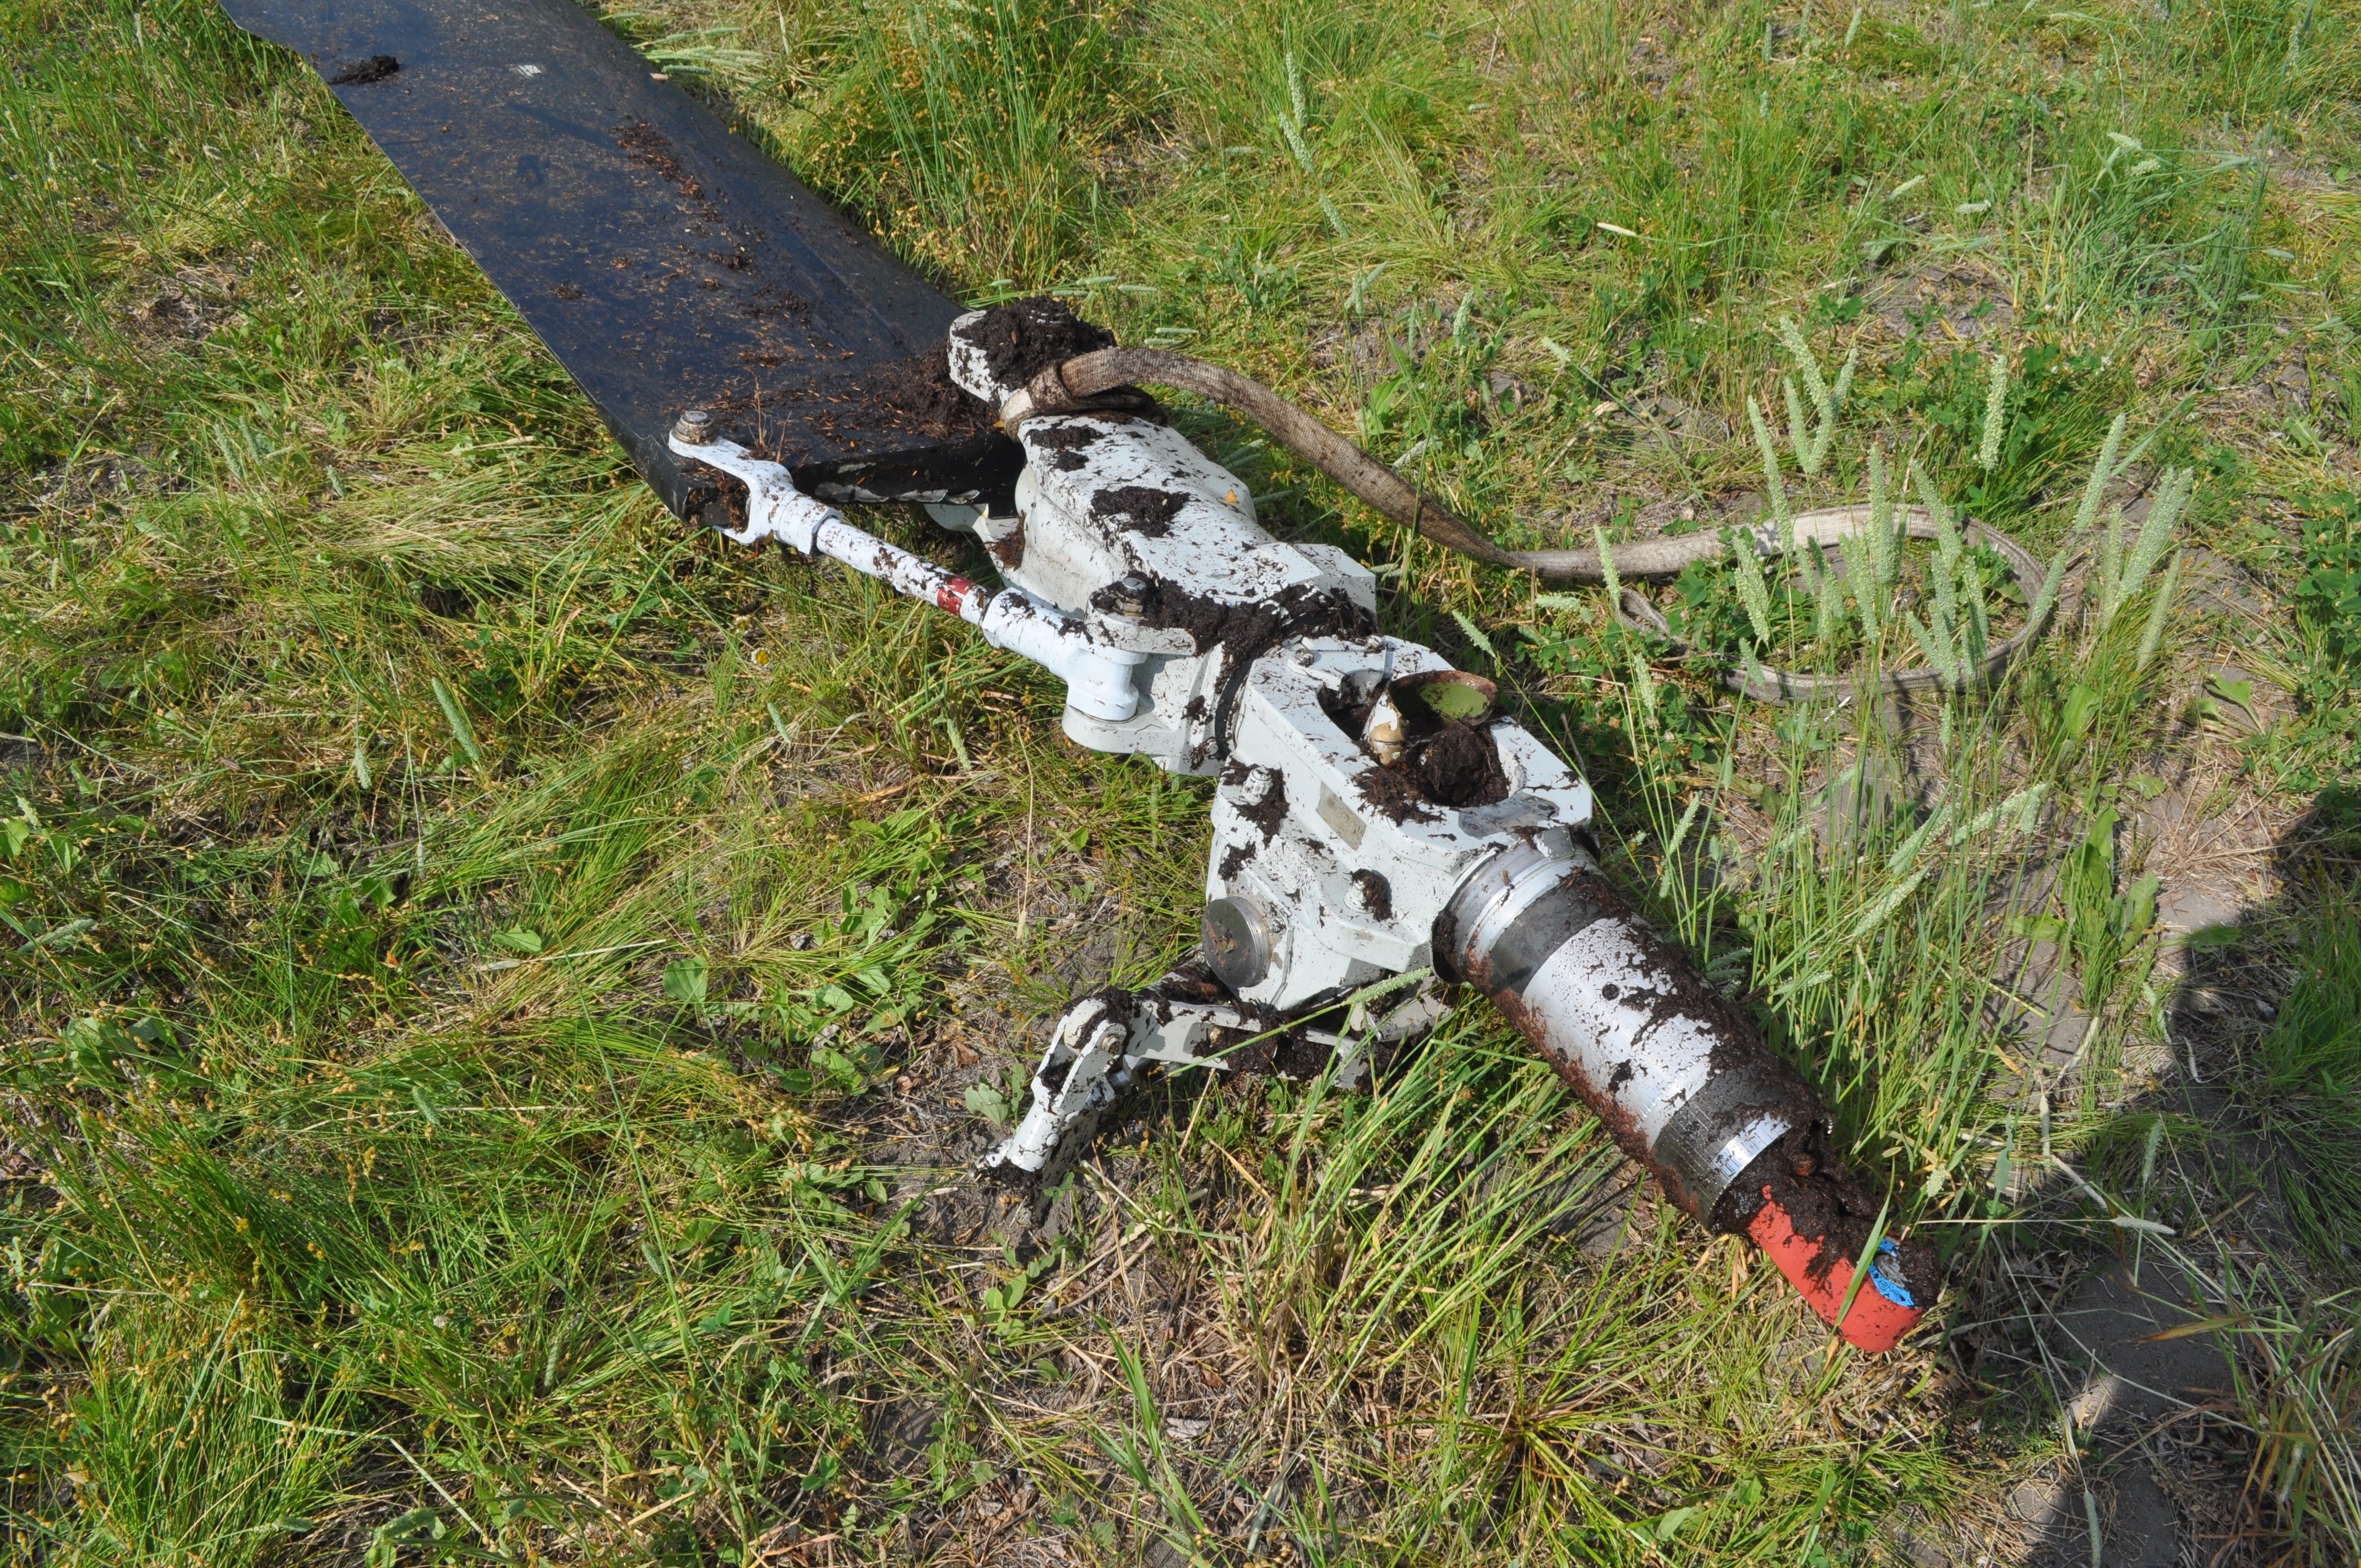
The second main rotor blade (blade B, Figure 3) separated from the helicopter with the rotor head assembly still attached and came to rest on top of wet muskeg 85 feet northeast of the main wreckage site.
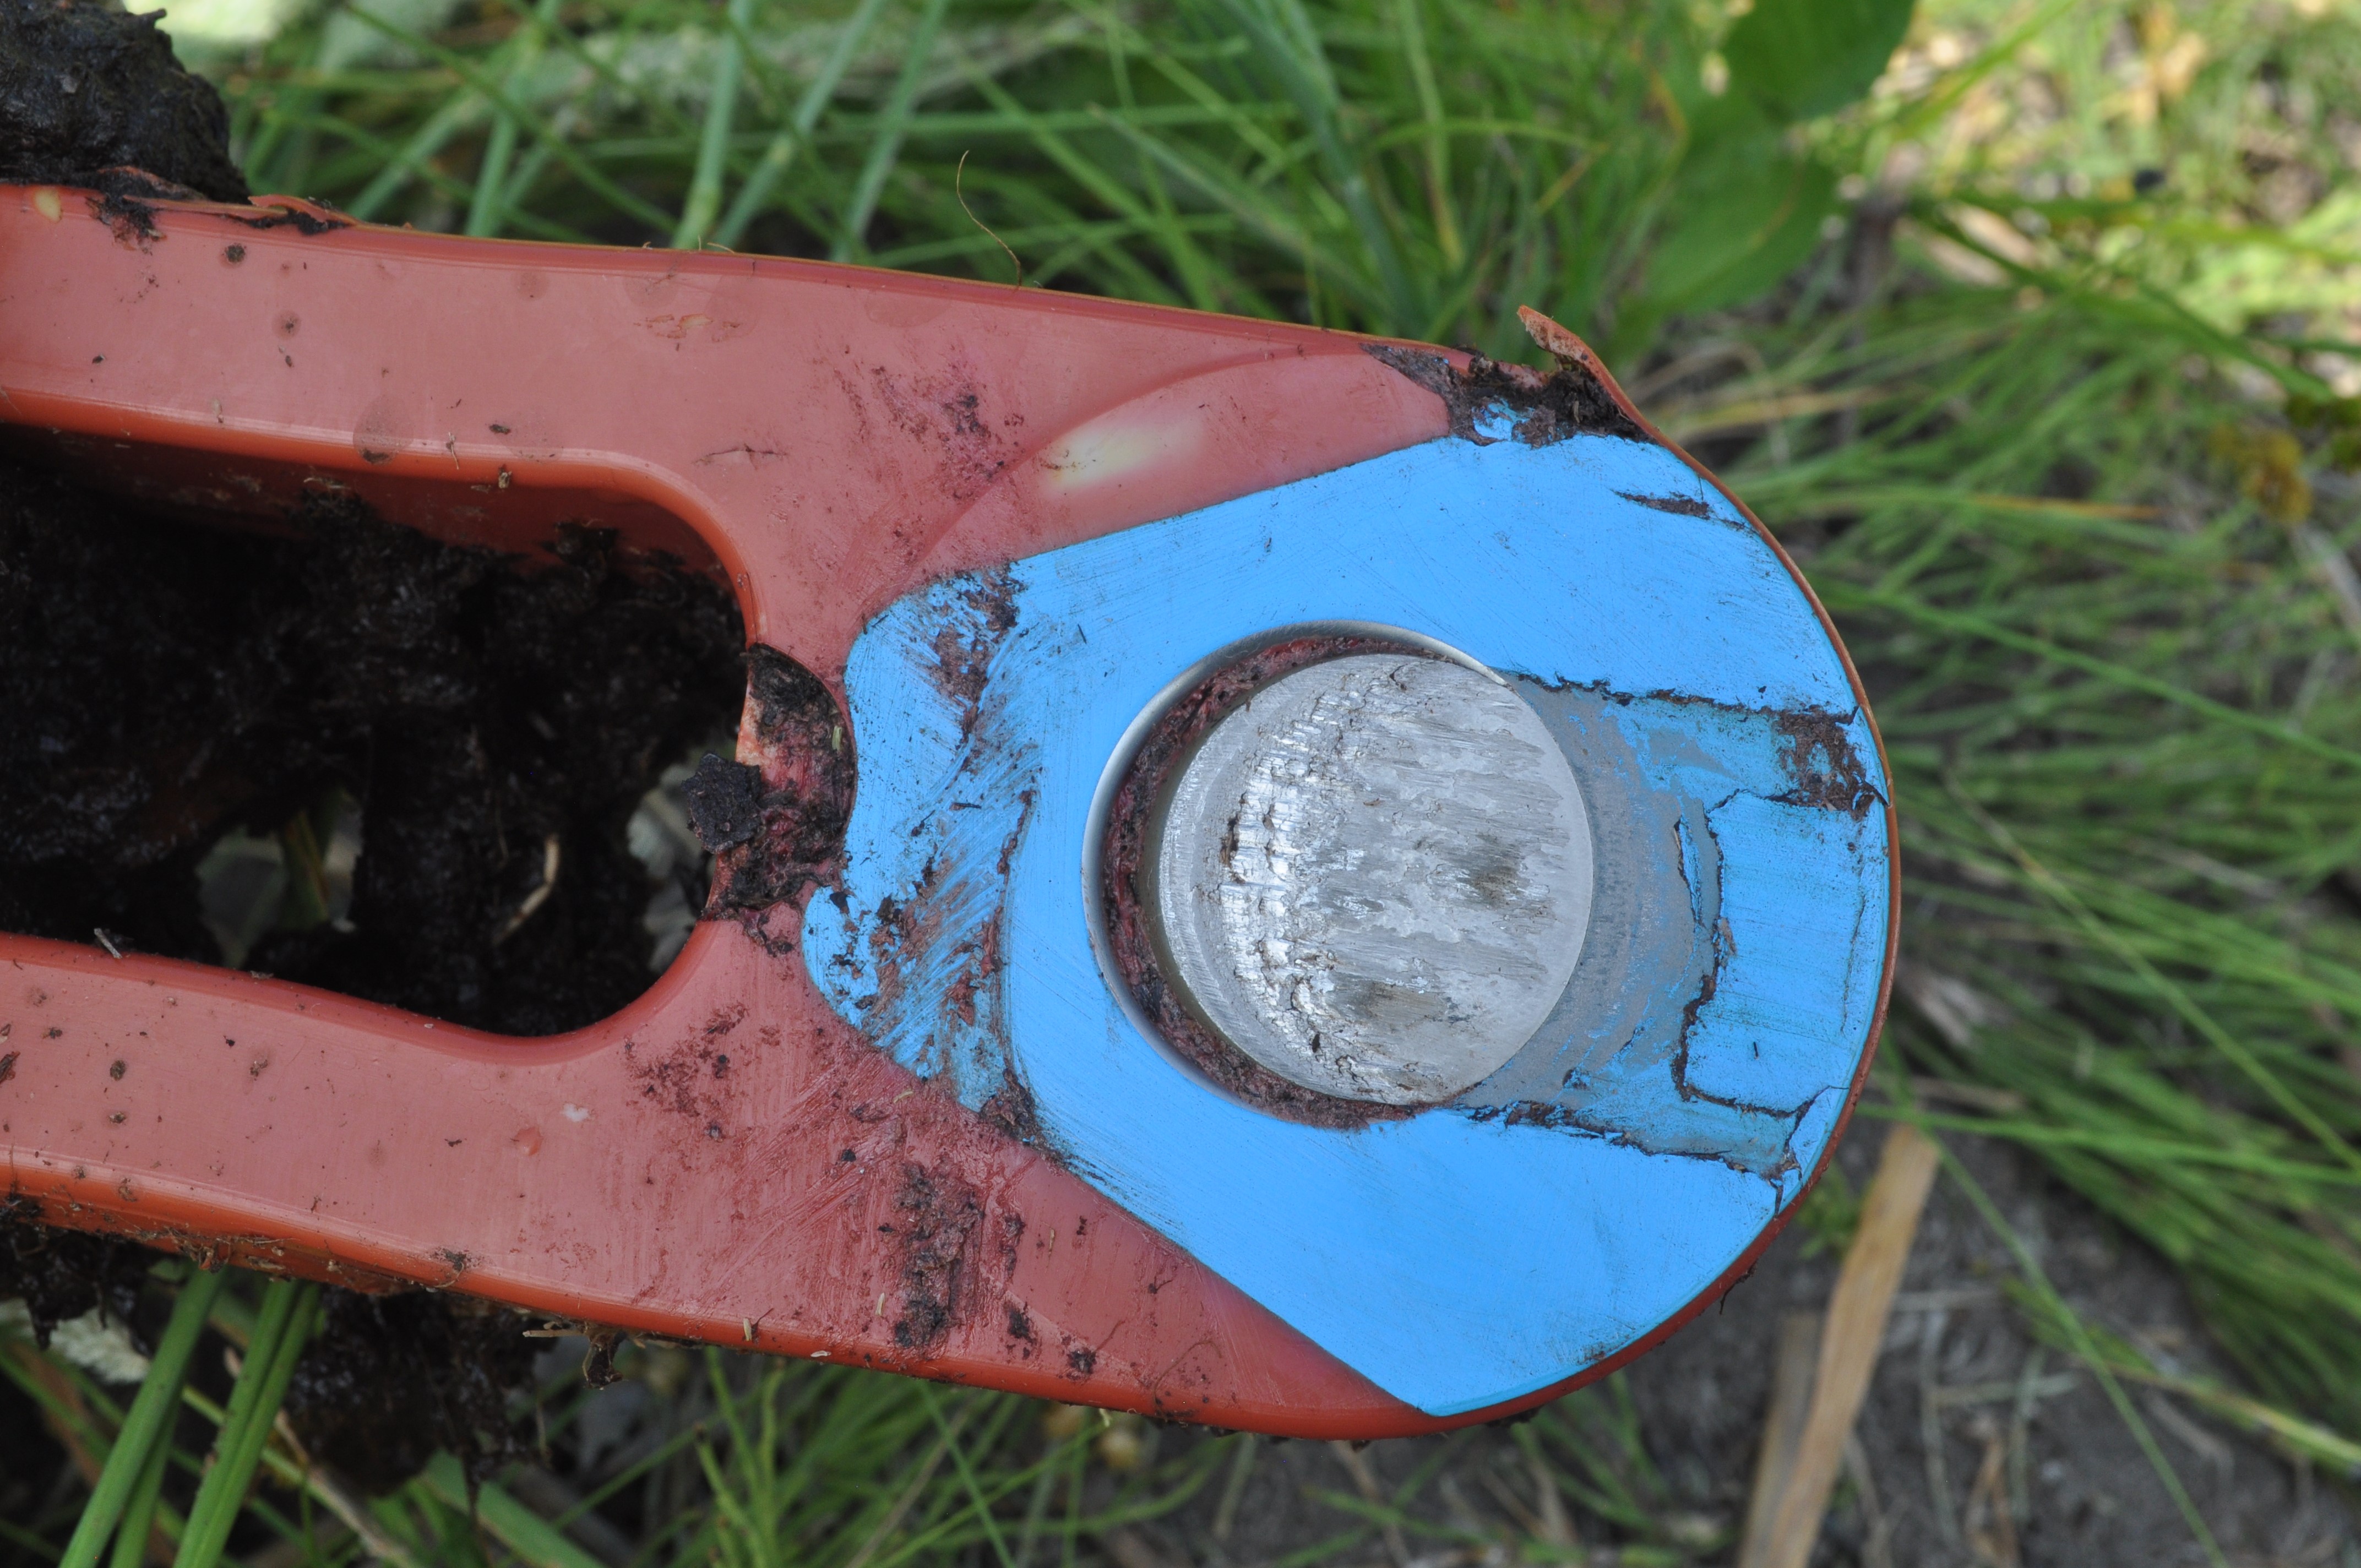
Both main rotor blades were recovered from the muskeg and brought to the staging area where the main rotor blades were removed from their respective blade grips (Figure 5, Figure 6). Investigators observed that the main rotor hub strap retaining pin of blade A had failed. Both grips and the main rotor head assembly were shipped to the TSB Engineering Laboratory in Ottawa, Ontario, for a detailed examination, and metallurgical analysis (see section 1.16 Tests and research).
No other defects were found that would have contributed to the occurrence.
1.13 Medical and pathological information
The investigation did not identify any information that would indicate that the pilot’s performance was affected by medical or physiological factors.
1.14 Fire
The majority of the fuselage and power train were consumed by the fuel-fed post-impact fire.
1.15 Survival aspects
The accident was not survivable due to the collision with terrain and post-impact fire. Although the helicopter was equipped with a 406 MHz ELT, for undetermined reasons a signal was not received.
1.16 Tests and research
1.16.1 TSB laboratory reports
The TSB completed the following laboratory report in support of this investigation:
- LP081/2021 – Failure of Tension-Torsion Strap Retaining Pin
1.16.2 TSB Engineering Laboratory examination
Both main rotor blade grips and the rotor head were disassembled so that all 4 of the main rotor hub strap retaining pins could be removed for examination.
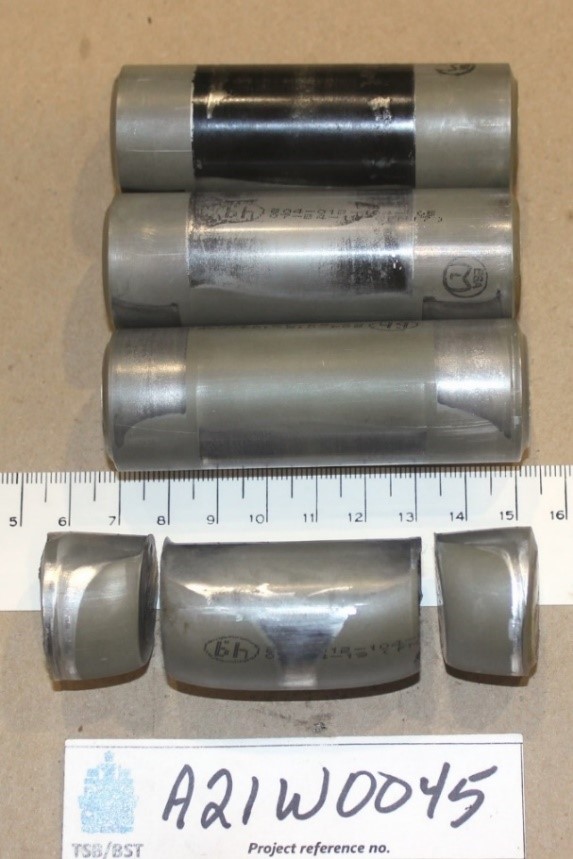
Metallurgical analysis of the 4 pins (part number 204-012-104-005) revealed that the failed pin (serial number FNFS90, bottom of Figure 7) was manufactured from 316 stainless steel, whereas the other 3 pins (serial numbers FNFS49, FNFS54, and FNFS75) were manufactured from H11 tool steel. The TSB Rockwell hardness test of the failed pin averaged 7.6 on the C scaleFootnote 2 (see section 1.18.2.4 Detailed inspection and hardness test).
1.16.3 Material
1.16.3.1 H11 tool steel
H11 tool steel is a steel alloy whose primary alloying elements are iron (91–92%) and chromium (5.3–5.5%). The steel also contains small percentages of carbon, manganese, silicon, molybdenum, vanadium, nickel, and copper. The preferred tempering method for a combination of hardness, toughness, yield strength, ultimate strength, and ductility is double-tempering at 1020 °F (550 °C). H11 tool steel is commonly used in the aerospace industry because of its impact toughness. It is a magnetic material.
H11 tool steel has a density of 0.282 pounds per cubic inch (lb/in³) and has a tensile strength of 260 kilopounds per square inch (ksi).Footnote 3 In addition, depending on the tempering process used, it has a hardness of between 52.5 and 57 on the Rockwell C scale. A completed part number 204-012-104-005 pin assembly weighs approximately 405 grams.
A critical characteristic specified for a part is a property that it must have to perform as engineered and intended. If a part does not have the specified critical characteristic(s), it may not be able to withstand the loads or wear imposed on it during operation, and could fail prematurely. The Bell engineering drawing used to manufacture the part number 204-012-104-003 pin specified a hardness of 50.0 to 53.5 on the Rockwell C scale as a critical characteristic of that pin. This characteristic is obtained through the double-tempering process on H11 tool steel.
1.16.3.2 316 stainless steel
316 stainless steel is a steel alloy whose primary alloying elements are iron (68%), chromium (17%) and nickel (10%). The alloy also contains a small percentage of molybdenum and is a non-magnetic material. 316 stainless steel is used in the aerospace industry where corrosion-resistant metal is required. It can resist temperatures up to 1598 °F (870 °C).
316 stainless steel has a density of 0.289 lb/in³ and a tensile strength of 84 ksi. This alloy cannot be hardened by thermal tempering, and as the material is significantly softer than H11 tool steel, its hardness is checked on the Rockwell B scale. It has a standard hardness registering 79 on the Rockwell B scale. A completed part number 204-012-104-005 pin made of 316 stainless steel weighs 418 grams.
1.17 Organizational and management information
1.17.1 Yellowhead Helicopters Ltd.
Yellowhead Helicopters Ltd. is a privately owned company providing commercial helicopter services to the public. The company is headquartered in Valemount, BC, and holds an air operator certificate issued by Transport Canada for operations under Canadian Aviation Regulations (CARs) Subpart 702 (Aerial Work) and Subpart 703 (Air Taxi). The company operates a fleet of 39 single-engine and twin-engine helicopters, and employs approximately 130 people. The company’s main base is in Prince George, BC, and it has several sub-bases located throughout BC and Alberta. Maintenance is primarily carried out through its own approved maintenance organization, which is also a Bell-certified service centre.
1.17.2 Bell Textron Inc.
Founded in 1935, Bell Textron Inc. was originally known as Bell Aircraft Company. It is currently a division of Textron Inc. and is headquartered in Fort Worth, Texas, United States. The company primarily produces rotorcraft for both civil and military use.
Bell completes the design and certification of its products. It does not, however, manufacture all of the individual parts or components that go into the final assembly of its products. For example, Bell did not manufacture the main rotor hub strap retaining pins; it subcontracted them out to 3 separate vendors for manufacture. All 4 retaining pins installed on the occurrence helicopter were manufactured by Fore Machine Company (FMC).
1.17.2.1 Product certification
Bell completed the design, engineering, and certification steps required to manufacture the main rotor hub strap retaining pin. These specifications were then disclosed to the various third party subcontractors who actually manufactured the part. Once manufactured, the parts were then shipped to Bell, which completed a receiving inspection to verify product conformity and, subsequently, certified the part as airworthy. The parts were either kept for in-house use or sold to outside customers for use on Bell products. When parts were sold and shipped to outside customers, the appropriate certification documentation would normally be produced and supplied with the part.
1.17.2.2 Vendor oversight
As part of its normal business practices, Bell provides a level of oversight to all of its suppliers, including FMC, to ensure that the policies and procedures used meet and are in accordance with Bell’s requirements. These include audits and site visits.
Bell conducted an audit of FMC in 2016, 2017, and 2019. Bell’s last audit of FMC before the occurrence pins were manufactured (in 2018) was completed on 17 August 2017 and covered Appendix I: Special Requirements for Offload of Bell Planning Operations, and Appendix VI: “Controlled Item Program” Supplier Requirements of Bell’s Supplier Quality Requirements Manual. This audit resulted in 2 findings, one related to FMC’s documentation control procedures, and the other related to measurement section analysis.
Personnel from, or representatives of, Bell would generally visit FMC facilities on an average of 1 to 3 times a month for various reasons, including completing source inspections, reviewing non-conformances that had arisen during the manufacture of Bell products, and verifying, validating, and rectifying defects.
During site visits, Bell personnel would regularly walk through the stores area to ensure that the area was orderly and that raw material was correctly identified and tagged. These oversight activities and site visits did not result in any significant observations or recommendations to FMC regarding its material storage processes.
FMC’s quality control department used helpers to assist the quality control inspector during times of high workload (see section 1.17.3.3.2 Personnel). Bell personnel did not physically observe the use of helpers by the FMC quality control department during any of their oversight visits. In addition, because FMC had not documented the use of helpers on any manufacturing paperwork or company standard operating procedures, Bell personnel were not aware that these helpers were performing quality control inspection tasks when the paperwork package for the part was reviewed and accepted by Bell personnel (or third party representatives of Bell) as part of the first article inspection process. Bell does not permit the delegation of tasks involving the inspection of critical characteristics.
1.17.2.3 Process for first article inspection
Bell has a first article inspectionFootnote 4 validation process in place to assess the manufacturing production process and to assess the final product the first time a vendor produces a new part for Bell. Bell would use a third party service provider to perform this validation to supplement or augment its internal resources as the need arose.
Bell provided the third party service provider inspectors who performed the validation on its behalf with specific training, including
- Bell’s Supplier Quality Requirements Manual training
- controlled item training
- information technology (IT) systems training
- supervised on-the-job training with a Bell inspector
In this case, the first article inspection validation was carried out at the vendor’s facility (FMC). The third party service provider inspector logs in to Bell’s IT systems to complete and document the inspection process just as an inspector who worked directly for Bell would do.
If the parts met the first article inspection criteria, they were shipped to Bell facilities and placed in their inventory system.
Bell had an audit process in place to verify that the third party service provider and personnel performing the first article inspection validations were meeting its objectives. The audit comprised the following:
- a quarterly overall review of the vendor’s performance;
- a quarterly review of an individual supplier’s performance where a third party service provider is used to perform the first article inspection;
- a quarterly review of the rejections by the third party service provider who performs the first article inspection;
- a monthly evaluation of the products inspected by the third party service provider who performs the first article inspection that are rejected later in the manufacturing process; and
- periodic checks of parts produced that have met the third party service provider’s first article inspection criteria to validate the results produced by the first article inspection vendor.
1.17.3 Fore Machine Company
1.17.3.1 General
FMC was located in Haltom City, Texas, United States, and had been producing various components for Bell since 1985. More specifically, the company started producing flight safety critical aircraft partsFootnote 5 for Bell in 2015. The main rotor hub strap retaining pins (part number 204-012-104-005) in this occurrence were from FMC’s first production batch for Bell.
Bell established the design criteria and specifications for the part required, and FMC produced a part that met those specifications. If any non-conformances were discovered during the manufacturing process, 1 of 2 things occurred:
- FMC reworked (fixed) the part to ensure it met the design specifications (non-controlled product only), or
- Bell was notified of the non-conformance in the product, and the matter was dealt with via the appropriate process (both controlled and non-controlled product).
On 19 November 2021, FMC ceased all operations and released all company personnel.
1.17.3.2 Raw material storage
The investigation determined that, when the occurrence pins were manufactured in the fall of 2018, FMC stored the raw material in its stores area by material diameter, not by type or composition. This meant, for example, that all rods that were 1 inch in diameter were stored together, regardless of the material they were made of (aluminum, carbon steel, stainless steel, brass, etc.). As a result, the onus was on the individual selecting the material for the job at hand to ensure that it was of the correct composition and specification.
1.17.3.3 Hardness testing
The investigation examined 3 aspects of hardness testing of individual parts at FMC:
- the procedure in place;
- the personnel performing the test; and
- the equipment used to perform the test.
1.17.3.3.1 Hardness testing procedure
At the time the occurrence pins were manufactured, FMC had established and implemented a hardness testing procedure. The purpose of the procedure was to “provide clear and concise procedures for hardness testing of metals.”Footnote 6 The procedure document described the general requirements for completing hardness testing, test standard requirements for machine calibration, machine calibration procedures, production testing, correction factors, acceptance criteria, and maintenance of test equipment.
The document did not describe or address the following items:
- qualification or training requirements for personnel physically performing the hardness testing
- hardness testing of flight safety critical aircraft parts or parts where the hardness is a critical characteristic
However, FMC also had a procedure in placeFootnote 7 that defined the controls required to comply with Bell’s Supplier Quality Requirements Manual when manufacturing controlled items, including those considered critical for flight safety. Section 6 of the document described the process requirements for hardness testing. The criteria set out in this section did not allow the use of helpers in the hardness testing or inspection procedure.
1.17.3.3.2 Personnel
At FMC, a limited number of trained individuals performed hardness testing of individual parts. The hardness testing on the batch of pins involved in this occurrence was signed for on the work travellerFootnote 8 on 05 March 2019. Training records indicate that the person who preformed quality control on and signed for the hardness testing of the entire batch of pins had last received refresher training on hardness testing on 04 December 2018.
Due to a high workload and the large number of pins in the batch to be inspected (342), the quality control inspector had requested additional help to complete the hardness testing in a timely manner. As a result, the company assigned 1 or 2 helpers to assist the quality control inspector.
Although it was an undocumented process, it was common practice at FMC for personnel from outside the quality control department—normally from the production floor—to be temporarily assigned to assist quality control inspectors as required. Before the helpers began the temporary assignment, FMC would provide training believed by the quality control department to be adequate for the job. When the helpers were no longer required, they would go back to their regularly assigned duties. The quality control inspectors would sign for the tasks completed by the helpers on the work traveller.
The view point of the senior quality management at the time the occurrence pins were manufactured was that the hardness testing procedure was a repetitive and mundane job that could be successfully completed by a helper with a minimal amount of training, allowing a quality control inspector to complete dimensional checks of the lot of pins, which was considered a task requiring more experience and training.
There was no documentation to identify who physically performed the hardness testing on the occurrence batch of pins. Therefore, the investigation was unable to determine what, if any, training on the operation of the hardness testing equipment the helper(s) had received.
In this occurrence, the helpers conducted the hardness testing of all pins, recorded the results, and gave the paperwork to the quality control inspector. The results recorded on the paperwork were within the acceptable range. Consequently, the quality control inspector reviewed the data, accepted the results provided, transcribed the information onto the appropriate paperwork for the work traveller, and signed off the task as being successfully completed.
1.17.3.3.3 Equipment
The machine used for the hardness testing was a semi-automatic model. This style of hardness testing machine relies on the operator’s ability to accurately complete all the steps required, in the correct sequence, in order to produce an accurate reading. While there is some automation incorporated into the equipment during the actual testing process, the preliminary setup steps must be performed manually.
The hardness tester was certified on 31 July 2018, 7 months before being used in the hardness testing of the pins involved in this occurrence. It was recertified 12 July 2019 during a routine 12-month recertification; no adjustments to the unit were required.
1.17.4 U.S. Federal Aviation Administration
1.17.4.1 Oversight of Fore Machine Company
Because FMC did not hold parts manufacturing or certification authority, the U.S. Federal Aviation Administration (FAA) did not provide any direct regulatory oversight of the company, nor was it required to do so. Oversight is primarily delegated to the production certificate holder, in this case Bell. Without parts manufacturing authority, FMC could not certify the parts it was manufacturing as airworthy; therefore, Bell would inspect and certify the products FMC produced, and issue the appropriate airworthiness documentation when it later sold those parts to customers.
1.17.4.2 Oversight of Bell Textron Inc.
The FAA provides regulatory oversight of Bell. As the holder of the original type certificate for the model 212 helicopter, Bell had been issued a production certificate,Footnote 9 which gave it the authority to manufacture and certify components and subassemblies required to manufacture and maintain the helicopter model. The FAA conducts audits of Bell vendor audits and supplier oversight processes. The last supplier audit of Bell/FMC, by the FAA Manufacturing and Inspection office, was conducted on 01 May 2018.
1.17.4.3 Regulatory requirements
The U.S. Federal Aviation Regulations governing the manufacture of aeronautical products require that holders of production certificates have in place a quality system that includes
(c) Supplier control. Procedures that -
(1) Ensure that each supplier-provided product, article, or service conforms to the production approval holder's requirements; and
(2) Establish a supplier-reporting process for products, articles, or services that have been released from or provided by the supplier and subsequently found not to conform to the production approval holder's requirements.Footnote 10
1.18 Additional information
1.18.1 Manufacturing of the occurrence main rotor hub strap retaining pins
1.18.1.1 General
Bell did not manufacture the main rotor hub strap retaining pin itself, but subcontracted the production of this part out to 3 separate vendors. The vendors were each assigned different serial number prefixes to identify the parts that they had manufactured. In this occurrence, the failed main rotor hub strap retaining pin was manufactured by FMC, which assigned the serial number prefix FN to the parts that it produced.
The manufacturing process for main rotor hub strap retaining pins involves first making part number 204-012-104-003 pins and then converting those to part number 204-012-104-005 pins by bonding an aluminum washer on each end of the pin.
1.18.1.2 Fore Machine Company’s manufacturing process for part number 204-012-104-003 pins
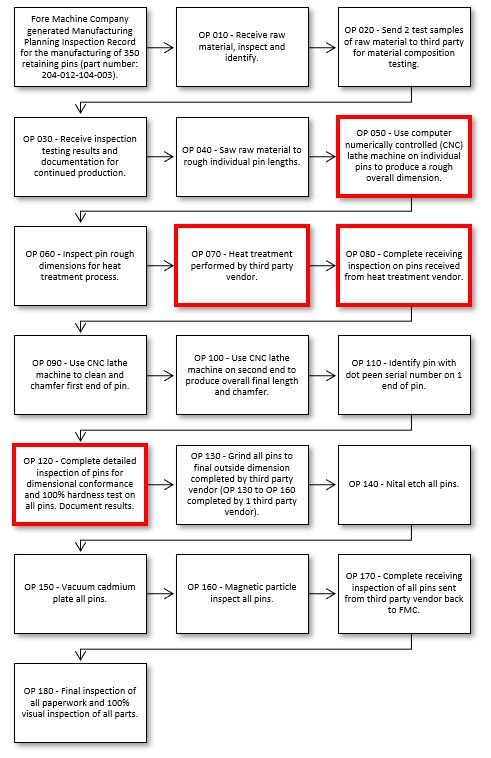
Figure 8 illustrates the individual tasks involved in manufacturing part number 204-012-104-003 pins, by operation (OP) number. The red boxes in the flowchart indicate steps in the process where there was the opportunity to identify if incorrect material was used.
1.18.1.3 Fore Machine Company’s process to convert part number 204-012-104-003 pins to part number 204-012-104-005 pins
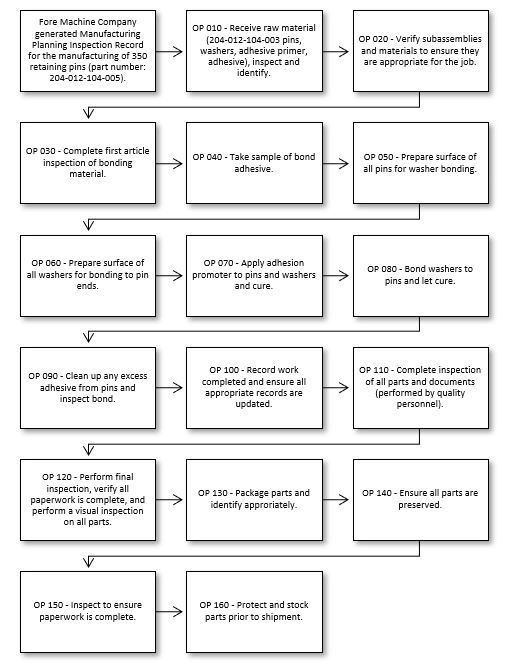
Once the part number 204-012-104-003 pins were manufactured, they were converted to part number 204-012-104-005 pins. Figure 9 illustrates the individual steps, or operations, involved in this process.
1.18.2 Chronology of the occurrence pin manufacturing process
1.18.2.1 Raw material supply
For the main rotor hub strap retaining pins involved in this occurrence, the manufacturing process was initiated with Bell’s order for 300 part number 204-012-104-005 pins from FMC on 11 June 2018. FMC placed an order with Fry Steel Company for enough raw material to manufacture 350 (50 more than ordered) part number 204-012-104-003 pins, which would then be converted into part number 204-012-104-005 pins.
1.18.2.2 Initial machine operation
On 06 August 2018, FMC ordered 8 rods of H11 tool steel, which were then shipped to the company along with the appropriate certification paperwork. On 02 October 2018, the stores department at FMC released the 8 rods of H11 tool steel to the production floor to begin the manufacturing process. Two test samples, each approximately 1 inch long, were cut from 2 of the 8 rods and sent for metallurgical analysis to confirm grain size and chemical composition. FMC personnel received the results of the metallurgical analysis, which were satisfactory, on 19 October 2018 and the manufacturing process continued. The investigation determined that the 8 rods of H11 tool steel would have yielded only approximately 320 pins.
If an inadequate quantity of raw material was issued to the job to generate the quantity of parts required, the machine operator would inform the supervisor, who would procure additional material to produce the quantity of pieces required for that specific job. This additional material was provided to the machine operator in order for the job to be successfully completed.
From 12 to 14 November 2018, the rods of raw material, which varied in length from 132 to 156 inches, were cut up into 36-inch lengths and then further cut into 3.3-inch lengths. The resulting 343 pieces would ultimately become the main rotor hub strap retaining pins.
1.18.2.3 Heat treatment
This lot of 343 pieces was sent to a third party vendor, Bodycote Thermal Processing (Bodycote), also located in Haltom City, Texas, for heat treatment, which is a critical characteristic of the part. Bodycote received the parts on 06 December 2018 and heat treated all 343 pieces. Following the heat-treating process, a hardness test was performed on a limited number of parts to ensure they met the design standard.
During this hardness test, Bodycote found several pieces that did not meet the hardness specification required; they measured between 8.3 and 11.1 on the Rockwell C scale. On 17 December 2018, production personnel from Bodycote contacted the FMC quality manager via e-mail to inform them of the discrepancy. Based on the information reported by Bodycote, the FMC quality manager believed the hardness of all parts within the lot should be checked, and that the lot should be sampled to determine material composition for those parts that did not meet the hardness requirements.
Several e-mail communication exchanges took place on 17 and 18 December 2018 regarding how to proceed with addressing the hardness issue. The investigation was unable to determine if a final solution was found. However, while several additional personnel at FMC were included on the e-mail—either as direct recipients or additional recipients (i.e., in cc)—including the individual that signed for receiving the parts back at FMC, the quality control inspector who performed the receiving inspection when the parts were returned from the heat treatment provider was not.
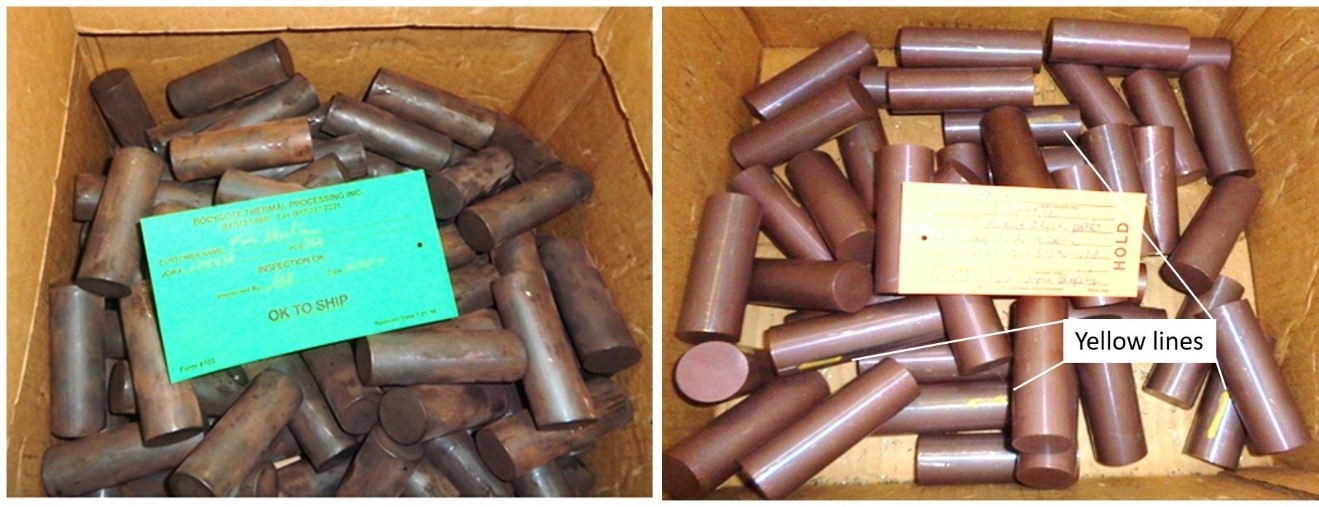
In the end, Bodycote performed hardness testing on all pins in the lot and marked the non-conforming pins with a short yellow line down the pin (Figure 10).
The lot of 343 pieces were returned to FMC on 09 January 2019. The Bodycote certification paperwork for the parts noted that 306Footnote 11 pieces met the hardness check of between 50.0 and 53.0 on the Rockwell C scale. The certification paperwork also noted that there were 44 pieces of “mixed material.” The conforming and non-conforming pins were segregated in 4 individual boxes and photographed at the heat treatment facility before shipping (as shown in Figure 10). The boxes of pins were loaded onto a pallet and subsequently shipped back to FMC to continue the production process.
1.18.2.4 Detailed inspection and hardness test
On 11 January 2019, FMC inspection personnel signed off the receiving inspection of the parts returned to them from Bodycote and continued to process the entire lot. The difference in the physical appearance (e.g. yellow lines) of the pins was not noticed by any FMC personnel. On 26 February 2019, each pin was assigned an individual serial number, which was stamped on the end of the pin.
On 01 March 2019, FMC personnel completed hardness testing of 342Footnote 12 pins and the results for the pin that failed in flight (serial number FNFS90) were recorded as 50.5 on the Rockwell C scale. On 05 March 2019, FMC quality control personnel signed off on the hardness check of all pins in the lot.
On 15 March 2019, FMC placed a purchase order with another third party vendor for the grinding to a final outside diameter, Nital etch,Footnote 13 stress relieving, vacuum cadmium plating, and non-destructive test inspection of the batch of pins.
The non-destructive test inspection was a magnetic particle inspection of each pin to ensure that there were no structural defects with the part produced (operation 160). However, because 316 stainless steel is a non-magnetic alloy, no defects would have been found during this inspection, and the test results would have been identical to the pins manufactured out of H11 tool steel that had no manufacturing defects. In addition, this inspection process, in and of itself, would not have identified the differences in material composition. As a result, all pins passed this inspection.
The vendor certified its work on 19 April 2019 and the parts were returned to FMC. On 04 July 2019, FMC quality personnel rejected 199 of the part number 204-012-104-003 pins due to non-conformances in the vacuum cadmium plating. On 11 July 2019, FMC personnel completed the first article inspection on an individual pin (serial number FNFS-4). The pin passed the inspection and was considered to be representative of the remaining batch of 142 pins.
It had been agreed that FMC would ship the completed part number 204-012-104-005 pins to Bell in 3 batches of 100 pins. On 11 July 2019, FMC generated a work package to convert the first batch of 142 Footnote 14 of the part number 204-012-104-003 pins to part number 204-012-104-005 pins. The manufacturing process started on 12 July 2019 and was completed on 24 July 2019. For undetermined reasons, 1 pin (serial number FNFS 115) was rejected during the process, leaving 141 completed pin assemblies.
1.18.2.5 First article inspection
Also on 24 July 2019, an FMC employee completed the first article inspection on a representative sample (serial number FNFS1) of the batch of 141 pins. No deficiencies were noted and the pin passed the inspection. On 29 July 2019, quality control personnel rejected 10 part number 204-012-104-005 pins,Footnote 15 leaving 131 acceptable pin assemblies and, on 30 July 2019, a final inspection was completed on the pins. On 12 August 2019, FMC quality personnel stamped the manufacturing process paperwork for 131 pins as complete. The lot of pins was shipped to Bell on 13 August 2019.
Bodycote originally identified 44 pieces as non-conforming. Of those 44 pieces, 32 were rejected during the manufacturing quality control process for non-conformances unrelated to raw material selection. The remaining 12 were shipped to Bell as part of the lot of 131 pins. Of those, 11 were either contained at, or ultimately returned to, Bell after the accident,Footnote 16 and 1 was the pin involved in this occurrence.
1.18.2.6 Yellowhead Helicopters’ installation of the hub strap retaining pins
1.18.2.6.1 Maintenance policy manual
In accordance with the CARs,Footnote 17 Yellowhead Helicopters’ maintenance department has established and maintains a maintenance policy manual (MPM), which is approved by Transport Canada. The manual provides specific business processes and tasks to be followed within the maintenance department.
1.18.2.6.2 Receiving inspection
Section 4.3 of the MPMFootnote 18 describes the receiving inspection that needs to be completed before placing aeronautical products in the company’s inventory system. The inspection includes:
- reviewing the documentation/certification paperwork supplied with the part;
- tracing the part to the applicable purchase order;
- performing a physical inspection of the part to confirm it matches the documentation;
- checking that the part conforms with the standard; and
- inspecting the part for damage in transit.
Yellowhead Helicopters has also established and maintains a company procedures manual (CPM). This manual sets out a methodical approach and lists the steps to be taken to correctly complete specific tasks. The CPMFootnote 19 provides a flow chart with the parts receiving procedure. This procedures lists the steps to properly receive parts into the system and ensure that no abnormalities exist.
On 08 July 2020, Bell shipped 4 main rotor hub strap retaining pins (part number 204-012-104-005) to Yellowhead Helicopters, including the one with serial number FNFS90. The pins were put into the Yellowhead Helicopters inventory system on 13 July 2020 and installed in the main rotor head assembly of the occurrence helicopter on 20 June 2021.
1.18.2.6.3 Final installation
Chapter 3 of the MPM covers the company’s maintenance system. Section 3.1Footnote 20 provides information on the aeronautical certification authority, including the requirements maintenance personnel must meet to exercise the privileges of an aircraft certification authority (ACA).
One step in completing maintenance release on an aeronautical product is to review and confirm the installation of new parts on an aeronautical product. Section 3.2.1Footnote 21 of the MPM states
[a]ny person who performs maintenance, elementary work or servicing on an aeronautical product shall use :
- the most recent methods, techniques, practices, parts, materials, tools, equipment and test apparatuses that are specified for the aeronautical product in the most recent maintenance manual or instructions for continued airworthiness developed by the manufacturer of that aeronautical product.Footnote 22
The ACA holder has the responsibility to ensure that a part meets the standards of airworthiness applicable to the installation of new parts, and that the part has been certified in accordance with Subpart 571 of CARs. Before installing a part, the ACA holder confirms:
- proper company documentation is included with the part;
- the part matches the description on the paperwork (part number, serial number, etc.);
- the part was not damaged during shipping or storage; and
- the part is eligible for installation on the specified aeronautical product.
1.19 Useful or effective investigation techniques
This helicopter accident occurred in Canada; however, the aircraft manufacturer, the main rotor hub strap retaining pin manufacturer, and all of the pertinent personnel involved in the pin manufacturing process were located in the United States. As a result, there was extensive co-operation between TSB investigators and investigators of the U.S. National Transportation Safety Board to collect data relevant to the occurrence.
2.0 Analysis
The investigation determined that operational factors were not considered to have contributed to this accident; therefore, the analysis will focus on the manufacturing process of the non-conforming main rotor hub strap retaining pin, including inspections for quality and conformance.
2.1 Main rotor hub strap retaining pin
The outboard main rotor hub strap retaining pin (part number 204-012-104-005, serial number FNFS90) failed in flight and one of the main rotor blades separated from the helicopter and rotor head assembly. The investigation determined that the pin was manufactured from 316 stainless steel instead of tempered H11 tool steel as designed. Because 316 stainless steel has approximately ⅓ the tensile strength of H11 tool steel, the pin was unable to withstand the forces applied to it during normal operations. As a result, the pin failed in a shear mode approximately 21.4 hours of time in service after being installed in the rotor head assembly.
Finding as to causes and contributing factors
One of the main rotor hub strap retaining pins—a flight safety critical aircraft part—was manufactured from a type of steel that was weaker than the steel required by design. As a result, the pin failed in flight and its associated main rotor blade separated from the helicopter. The remaining blade and the main rotor head assembly subsequently separated from the helicopter and the helicopter impacted the ground.
2.2 Fore Machine Company
2.2.1 Raw material supply
The Fore Machine Company (FMC) initially ordered 8 rods of H11 tool steel to manufacture 350 main rotor hub strap retaining pins. FMC received the 8 rods into its inventory and then recorded all 8 on the work traveller to be used for pin manufacturing.
At the time the pins were being manufactured, FMC stored the raw material by diameter or profile, not by material composition. As a result, when a worker collected material to complete the assigned job, it was up to that individual to ensure that the correct specification of material (e.g., carbon steel, aluminum, titanium, 316 stainless steel, H11 tool steel) was selected.
The U.S. Federal Aviation Administration (FAA) was not required to perform regulatory oversight of FMC’s operation; therefore, there was no requirement for FMC to have FAA–approved receiving or stores procedures or processes in place.
Finding as to risk
If the segregation and storage of material do not include processes to ensure that the correct material for a job is selected, there is a risk that incorrect material will be selected.
One of the initial steps in the manufacturing process for the pins involved in this occurrence was to send samples from 2 of 8 the raw material rods to a third party for an analysis of the metallurgical properties to ensure that they conformed to the manufacturer’s drawing requirements (operation 020). Both of the test samples passed. However, this represented only 25% of the raw material; the remaining 6 rods were not tested. It is likely that FMC assumed that, because all raw material came from the same manufacturing lot, if the 2 samples passed, all material would pass.
Finding as to risk
If aerospace product manufacturers do not test sufficient samples of all raw material lots used to manufacture flight safety critical aircraft parts, there is a risk that non-conforming material will be inadvertently introduced into the manufacturing process.
2.2.2 In-process inspections
During the pin manufacturing process, there were several steps where quality control inspections provided an opportunity to discover incorrect material.
2.2.2.1 Initial machine operation
During the initial phase of manufacturing, the raw steel rod material was cut up into pieces approximately 36 inches long, and then into individual pieces 3.3 inches long (operation 040/050).
The investigation completed an approximate calculation to determine if 8 rods of H11 tool steel would be enough to produce the required 350 pins. It was determined that the 8 rods would likely only produce approximately 320 pins, so additional raw material would have been required.
At FMC, in such situations, if additional material were needed, the machine operator would inform their supervisor, who would then go and retrieve enough material to complete the job. In this occurrence, it is likely that this is the point where the 316 stainless steel was introduced into the production process. However, the investigation was not able to find a record of any additional material being requested, issued, or used to complete this particular job. Having records of all the material used in the manufacturing process provides an opportunity for quality control processes to identify conformity issues.
Finding as to risk
If all material used for a manufacturing process is not recorded, there is a risk that the quality control and inspection processes will not effectively ensure the manufacturing process conforms to the specification.
2.2.2.2 Heat treatment
After the initial machining operation, the 343 pieces produced were sent to Bodycote Thermal Processing (Bodycote) for heat treatment (operation 070). While completing the heat treatment, the company performed a hardness check on several of the pins to ensure that the process was completed satisfactorily, and that those parts met the required specification. It was during this step of the process that Bodycote discovered several pieces that did not meet the hardness specification and determined that they were of a different material.
Bodycote contacted FMC quality personnel by e-mail to notify them of the discrepancy in material in some of the parts. Several exchanges took place between FMC personnel and Bodycote production personnel and, ultimately, all pieces were tested for hardness and returned to FMC with the certification paperwork. However, not all pertinent quality control personnel (i.e., the quality control inspector who performed the receiving inspection when the lot of pins was returned to FMC for further production) were included in the e-mail communication.
When Bodycote completed the certification paperwork for the batch of pins, a note was included on the certification documentation, indicating that there were “44 [pieces] of mixed material.” However, the hardness test results of those individual pins were not recorded because the pins did not have an identifying serial number assigned to them. The pins were, however, separated into 2 different boxes, as shown in Figure 10, clearly identifying the conforming and non-conforming pieces. The investigation was unable to determine if or how the conforming and non-conforming pins were segregated when they were received at FMC.
Finding as to risk
If effective inter-departmental communication is not maintained within a manufacturing organization, particularly with the quality control department, there is a risk that pertinent personnel will not be provided with relevant information. As a result, inspection steps may not be effectively accomplished, which could allow non-conforming material to proceed through the production cycle.
When the pins were returned to FMC following the heat-treating process, the FMC quality control inspector completed the receiving inspection of the pins (operation 080). The pin heat-treating certification documents noted the following:
- 44 pieces were mixed material
- the entire lot of pins was heat treated
- 306 of the pins tested had a hardness of 50.0 to 53.0 on the Rockwell C scale
The FMC quality control inspector accepted the entire batch of pins for continued production operations.
Bodycote identified 44 pieces of “mixed material” and 306 pieces of conforming product; these numbers were based on the total of 350 pieces requiring heat treatment, as listed on the original purchase order listing. However, in reality, FMC only sent over 343 pieces, not 350. This then leads to 2 possibilities. The first is that the count of 306 pieces was accurate, and the resulting non-conforming material pieces count was actually 37 pieces of mixed material, not 44 as stated on the certification paperwork. The second is that the count of 44 pieces of mixed material was accurate, resulting in 299 conforming pieces, not 306, as stated on the certification paperwork. Based on a detailed examination of the picture (Figure 10, right) of the segregated non-conforming pins, it is likely that there were in fact 44 pieces of non-conforming material and 299 pieces of conforming H11 tool steel parts, not the 306 as stated on the paperwork.
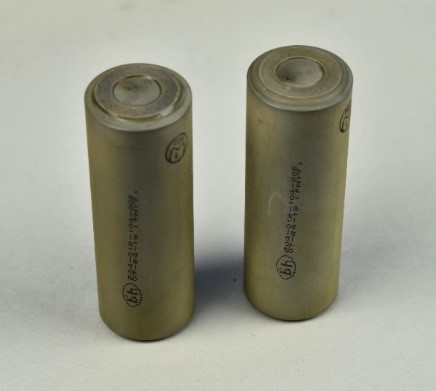
A normal part of the receiving inspection process is a visual inspection of the parts being received. As shown in Figure 10, there is a distinct difference in the visual appearance of the raw pin blanks (H11 tool steel vs. 316 stainless steel) being returned from the heat treatment vendor. In addition, the pins that did not meet the hardness specification were identified with a yellow line marked down the side of the pin.
Senior quality control management within FMC did not communicate the observations made by the heat treatment provider in the e-mail exchange with the quality control inspector. As a result, the inspector was not aware that they should anticipate and would have to deal with incoming non-conforming parts.
Finding as to causes and contributing factors
For undetermined reasons, the quality control inspector at FMC did not observe, either through visual inspection or through a review of the certification paperwork, that mixed material was identified in the lot. Consequently, pins made of the incorrect material specification were allowed to continue through the production process.
2.2.2.3 Detailed inspection and hardness test
As the manufacturing process continued, each individual pin was assigned a specific serial number, which was stamped onto the end of the pin (operation 110). A detailed inspection was then completed on the batch of pins (operation 120). This inspection was conducted by FMC personnel and included a review of the completed paperwork package to date, a physical and dimensional inspection of a sample of the pins, and a hardness test of all of the pins. The results of the hardness test were recorded in the paperwork that accompanied the work traveller. FMC personnel recorded a hardness value of 50.5 on the Rockwell C scale for pin serial number FNFS90. However, testing of the same pin at the TSB Engineering Laboratory determined that it had an actual average hardness of 7.6 on the Rockwell C scale.
When the inspection department received a large number of pieces for quality control during the manufacturing process, FMC would assign helpers to assist with certain tasks during the short-term significant increase in workload. This was the case at the time the pins involved in this occurrence were manufactured. The quality control inspector requested assistance to ensure that the job would be completed in a timely manner, and company management reassigned personnel from the production floor to help. At the time, senior quality management believed that hardness testing was a fairly routine and mundane task, and that assistance with performing the hardness testing task would allow the quality control inspector to focus on the detailed physical and dimensional inspection tasks that required more experience and knowledge. Before performing the tasks, the helpers would normally receive training on the operation of the hardness testing machine.
FMC used a semi-automatic hardness tester at the time the affected batch of pins was manufactured. To produce accurate results, the operator must be properly trained on how the unit works. FMC provided this training to some, but not all, personnel. The investigation reviewed the hardness tester calibration records for both before and after the testing of pin FNFS90. These records indicated that there were no existing deficiencies with the equipment.
Because no deficiencies were found with the equipment, the only remaining variable in the hardness testing procedure was the operation of the equipment by the helper assigned to the task. However, the only initials on the work package for the pins were those of the quality control inspector; therefore, the investigation was unable to determine with certainty the identity of the helper, or helpers, and what, if any, training they received on hardness testing before testing this batch of pins.
The result of the hardness testing process indicated the material met specification when, in reality, it did not. Because the quality control inspector did not directly supervise any helper assigned to perform the hardness test, the inspector was unaware that the results of the testing were incorrect and signed off the paperwork that a satisfactory result was obtained.
A review of the hardness testing policy FMC had in place at the time the occurrence pins were manufactured revealed that the standard operating procedure did not describe the qualifications and experience that the person performing the hardness testing was required to have. In fact, the policy did not address personnel at all. Although the Supplier Quality Requirements Manual published by Bell Textron Inc. (Bell) did not allow the use of helpers for the hardness testing procedure, using helpers instead of quality control personnel was not specifically against FMC’s standard operating procedure for hardness testing.
Finding as to cause and contributing factors
The lack of training requirements for hardness testing within the standard operating procedures likely contributed to the procedure being completed incorrectly. As a result, the non-conforming pins were allowed to continue in the manufacturing process.
2.2.2.4 First article inspection
Because this was the first time FMC was manufacturing main rotor hub strap retaining pins for Bell, Bell required FMC to carry out a first article inspection on the product. The first article inspection for the initial batch of 201-012-104-005 pins was completed on pin FNFS4 and was considered to be a representative sample of the lot produced. The inspection was completed by FMC personnel on 24 July 2019 and was accepted by representatives of Bell on 09 August 2019.
A review of all certification paperwork was completed during this process. However, the note from Bodycote on the heat treatment certification regarding the batch containing 44 pieces of mixed material and the entry stating that only 306 pieces of the 350 sent for heat treatment passed the hardness test of 50.0 to 53.0 on the Rockwell C scale both appear to have been overlooked. Because the hardness result for the pin with serial number FNFS90 that FMC recorded at 50.5 had been obtained erroneously, a review of the rest of the documentation would not have revealed any discrepancies with the manufacturing process or the product.
2.3 Bell Textron Inc.
2.3.1 First article inspection validation
Bell did not perform the first article inspection validation on this batch of pins produced by FMC. It used a third party vendor to perform the first article inspection validation on its behalf to ensure that the parts met Bell’s requirements.
The third party vendor reviewed the document package provided from FMC for the main rotor hub strap retaining pins as part of its acceptance process for the pins. The acceptance process also involved a physical inspection of the parts.
The certification paperwork from Bodycote, where the heat-treating process had taken place, included a statement that there were 44 pieces of mixed material and only 306 pieces had passed the hardness inspection. This statement provided an opportunity for the personnel reviewing the paperwork to suspect something may be amiss. However, nothing in the FMC document package reviewed by the third party confirmed this had occurred.
The hardness values recorded on the paperwork for the pins were all within the required specifications. As a result, without physically rechecking every part in the lot, a review of the paperwork did not reveal anything anomalous.
Finding as to causes and contributing factors
For undetermined reasons, the quality control systems in place at FMC did not identify the non-conforming main rotor hub strap retaining pins; consequently, the pins were not identified and removed from the supply chain.
2.3.2 Oversight activities
As a part of Bell’s site visits to FMC, the material storage procedures were observed. The stores area was inspected to ensure that a particular piece of raw material could be positively identified and had the appropriate certification paperwork and traceability. However, the site visit did not examine, from an overall point of view, the hazard of having multiple material types stored together, which introduces the possibility that incorrect material could be accidently selected for a job. While Bell’s oversight and audit processes for FMC met the regulatory requirements, it did not bring to FMC’s attention the overall hazard posed by storing different specifications of material together.
Finding as to risk
If inspections do not consider all potential hazards and instead focus on particular aspects of a process, such as paperwork and traceability, hazards, such as having mixed material stored together, may not be identified.
2.4 End-user inspection
In this occurrence, the final 2 opportunities to prevent the non-conforming parts from being installed on the aircraft were when the stores department of Yellowhead Helicopters Ltd. (Yellowhead Helicopters) performed a receiving inspection, and when aircraft maintenance engineer physically installed the part on the aircraft.
2.4.1 Receiving inspection
As required by the regulations, Yellowhead Helicopters has a Transport Canada–approved maintenance policy manual (MPM) in place to govern how maintenance procedures are to be accomplished. This manual includes a chapter on how to perform a receiving inspection when new parts are received from approved vendors, such as Bell.
The company also has a company procedures manual (CPM), which lists the steps to follow to successfully complete specific tasks. This manual includes a parts receiving procedure flow chart to guide the stores personnel through the various steps and checks to ensure that parts meet the standards required for installation on an aeronautical product.
In this occurrence, because there was no difference between the physical appearance of the non-conforming pin and a conforming pin, and the paperwork supplied by Bell met the requirements of both the regulations and Yellowhead Helicopters, there was no reason for receiving personnel to suspect that any of the parts received did not meet the appropriate standards.
2.4.2 Final installation
The last opportunity to catch non-conforming material is when a part is installed on the component or aircraft. In this occurrence, it would have been when the aircraft maintenance engineer at Yellowhead Helicopters replaced the set of 4 pins and 2 straps the week before the accident.
After reviewing the documentation that the company received with the part from Bell, and reviewing the physical characteristics of the non-conforming pin against a conforming pin, the investigation determined that it would be unreasonable to expect the aircraft maintenance engineer to have been able to identify the differences between the 2 parts (Figure 11). The physical appearance of each pin was essentially identical, and the weight difference between the 2 of them was approximately 13 grams, a discrepancy of 3.2%.
Finding: Other
Because proper certification paperwork was supplied to the Yellowhead Helicopters maintenance department, and the physical differences between the 2 parts were negligible, there was no reason for either the stores receiving personnel or the aircraft maintenance engineer who replaced the pins to reject the occurrence pin.
3.0 Findings
3.1 Findings as to causes and contributing factors
These are conditions, acts or safety deficiencies that were found to have caused or contributed to this occurrence.
- One of the main rotor hub strap retaining pins—a flight safety critical aircraft part—was manufactured from a type of steel that was weaker than the steel required by design. As a result, the pin failed in flight and its associated main rotor blade separated from the helicopter. The remaining blade and the main rotor head assembly subsequently separated from the helicopter and the helicopter impacted the ground.
- For undetermined reasons, the quality control inspector at Fore Machine Company did not observe, either through visual inspection or through a review of the certification paperwork, that mixed material was identified in the lot. Consequently, pins made of the incorrect material specification were allowed to continue through the production process.
- The lack of training requirements for hardness testing within the standard operating procedures likely contributed to the procedure being completed incorrectly. As a result, the non-conforming pins were allowed to continue in the manufacturing process.
- For undetermined reasons, the quality control systems in place at Fore Machine Company did not identify the non-conforming main rotor hub strap retaining pins; consequently, the pins were not identified and removed from the supply chain.
3.2 Findings as to risk
These are conditions, unsafe acts or safety deficiencies that were found not to be a factor in this occurrence but could have adverse consequences in future occurrences.
- If the segregation and storage of material do not include processes to ensure that the correct material for a job is selected, there is a risk that incorrect material will be selected.
- If aerospace product manufacturers do not test sufficient samples of all raw material lots used to manufacture flight safety critical aircraft parts, there is a risk that non-conforming material will be inadvertently introduced into the manufacturing process.
- If all material used for a manufacturing process is not recorded, there is a risk that the quality control and inspection processes will not effectively ensure the manufacturing process conforms to the specification.
- If effective inter-departmental communication is not maintained within a manufacturing organization, particularly with the quality control department, there is a risk that pertinent personnel will not be provided with relevant information. As a result, inspection steps may not be effectively accomplished, which could allow non-conforming material to proceed through the production cycle.
- If inspections do not consider all potential hazards and instead focus on particular aspects of a process, such as paperwork and traceability, hazards, such as having mixed material stored together, may not be identified.
3.3 Other findings
These items could enhance safety, resolve an issue of controversy, or provide a data point for future safety studies.
- Because proper certification paperwork was supplied to the Yellowhead Helicopters Ltd. maintenance department, and the physical differences between the 2 parts were negligible, there was no reason for either the stores receiving personnel or the aircraft maintenance engineer who replaced the pins to reject the occurrence pin.
4.0 Safety action
4.1 Safety action taken
4.1.1 Bell Textron Inc.
On 05 July 2021, Bell Textron Inc. (Bell) issued 4 alert service bulletinsFootnote 23 covering model 204B, 205, 205B, and 212 helicopter fleets. The alerts required the review of the aircraft’s technical record to determine if any main rotor hub strap retaining pins with the serial number prefix FNFS were installed. If pins with the affected prefix were installed, they were to be replaced with pins of a different serial prefix before further flight.
4.1.2 Transport Canada
On 05 July 2021, Transport Canada issued an emergency airworthiness directive (CF-2021-23) mandating compliance with the Bell alert service bulletins affecting model 204, 205, and 212 aircraft fleets in Canada before further flight.
4.1.3 U.S. Federal Aviation Administration
On 06 July 2021, the U.S. Federal Aviation Administration (FAA) issued an emergency airworthiness directive (AD 2021-15-51), mandating compliance, before further flight, with Bell alert service bulletins affecting model 204, 205, and 212 aircraft fleets. In March 2022, the FAA issued a follow-on AD (AD 2022-06-03), which included the Bell 210 model and clarified wording in the original AD.
4.1.4 European Aviation Safety Administration
On 08 July 2021, the European Aviation Safety Administration (EASA) issued an emergency airworthiness directive (AD 2021-165-E), mandating the replacement of main rotor hub strap pins with the serial number prefix FNFS on European-registered model 204, 205, and 212 aircraft fleets before further flight.
4.1.5 Yellowhead Helicopters Ltd.
On the evening of 28 June 2021, shortly after the occurrence, Yellowhead Helicopters Ltd. stood down all aircraft operations. On the afternoon of 29 June 2021, the Bell 206 and Airbus AS350 fleets were returned to service. The Yellowhead Helicopters Ltd. Bell 212 fleet remained grounded until the Bell alert service bulletin 212-21-165 was issued, and it had been confirmed that the remaining aircraft did not have main rotor hub strap retaining pins with the affected serial number range installed. The Bell 212 fleet was returned to service on the afternoon of 05 July 2021.
This report concludes the Transportation Safety Board of Canada’s investigation into this occurrence. The Board authorized the release of this report on . It was officially released on .
